Welcome to the first (hopefully of many) posts to the new blog. This post is based around an issue that was raised to me that they couldn’t virtualise an exhibit for a case they were working on.
I will mention a number of tools in this post and I want to add I don’t have any vested interest in any of them! These tools just so happen to be the ones available to me and/or my personal preferences.
There are a number of reasons that you might want to create a VM of a device, from wanting to check the settings of a particular program to extracting passwords from browsers such as Google Chrome. Although many of the things that you might want to display from a VM can be done by interpreting a settings file or sifting through registry keys, sometimes it is just so much nicer to have a visual capture of the settings as the user would have seen them.
There have been many posts on how to create a VM from a forensic image file and some very good software has been created to help in this task. This post, however, is dedicated to creating a VM of an exhibit that is NOT in a bootable state at the time of seizure.
So, the investigator has tried creating a VM from scratch using Virtualbox and also tried using Virtual Forensic Computing (VFC), which is usually pretty good at making VM’s when they don’t usually work. The machine would start up but no operating system would boot and there was a Windows 7 (x64) system installed. Time for a little bit of work!
The starting place for our investigation was to check the Master Boot Record. At a very quick glance, it appears to be intact, the boot code looks normal and there are partition entries. However, a closer inspection reveals that the partition is set to inactive.

Normally, we would expect to see a value of 0x80 for the byte that is set to 0x00. It appears the rest of the entry is intact as well and if you use the X-Ways Template manager to view the data, it matches the location of the start of the NTFS partition.
This behavior is especially odd as the device was showing as being used very close to the time the device was seized, definitely within 12 hours of the last activity on the device. So our first job is to fix the MBR for the VM.
To do this, I use Arsenal Image Mounter from Arsenal Recon. I prefer this to FTK imager as it provides a true mounted disk (similar to Encase PDE but without having to dirty my system with Encase) and that gives some additional capabilities. But when mounting with this tool, we set it to keep a cache of changes made to the disk. Also note what physical drive the image file is mounted as, we will need that later.
Interestingly, as soon as the disk is mounted, it is showing as an uninitialized disk within the Disk Management window. So now we need to change the data on the disk using a hex editor. I’m a big X-Ways Forensics fan and, although X-Ways won’t allow you to change data, Winhex that ships with it allows you to easily change the values.
Run Winhex in administrator mode and open the physical disk. Once this is done, simply navigate to the first byte of the record (offset 446) and type 0x80 into the byte. It should show up as red and then press Ctrl+S to save the change. We are not actually altering evidence here, due to the write cache on the image file, so don’t worry.
Now we are going to try and make a VM out of this newly changed disk. However, given the errors that you can easily get with creating VM’s off virtual disks and using different software, we are going to create a VMDK of the disk using Virtualbox. For those who don’t know about frequent VM errors, the Physicaldrive can be shown as being used and therefore stops the virtualisation software using it. This usually requires a restart of the machine, which is pain as you usually always have something processing.
So to create the VMDK file from the mounted image file, we can use the following command:
cd C:\Program Files\OracleVirtualBox

C:Program FilesOracleVirtualBox>vboxmanage convertfromraw \\.PhysicalDriveX "C:\outputpath\outputfilename.vmdk" --format VMDK
This will usually take between half an hour and a couple of hours depending on your machine and the size of the disk. But once this has been done, we have a VMDK that no longer requires the disk to be mounted and has the primary entry in the MBR marked as active. You can also create a copy of the VMDK file in case we break the original!
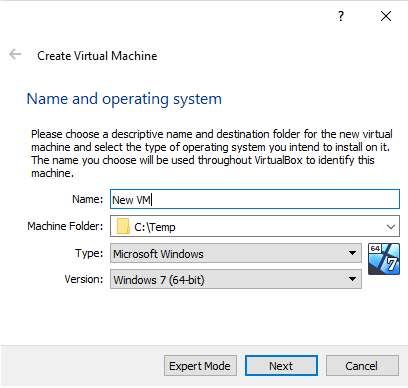
Now to create a new VM to try and boot this system. I was using Virtualbox, but VMware player should work equally well, so the screenshots will be for this software. These should provide a rough guide for creating a VM in virtualbox and remeber to select the VMDK we created earlier for the hard drive.


Now, simply starting the VM still gives us an error to say “Operating system cannot be found”. This is clearly a larger issue than the MBR entry being broken. So, in order to try and fix this, we can attach a Windows Installation ISO to the VM. This will give us some repair functionality to try and get this system working. I used a Windows 8.1 ISO for this machine, however any version equal to or newer than the version you are trying to fix should be fine.
Once the VM started it gave us the option to boot from the installation disk by pressing any key. Once the ISO booted, we selected “Repair your computer > Troubleshoot > Advanced Options > Command Prompt”. This opened the command prompt within the repair tools.
Now there are several things that can cause the system not to boot correctly. The first is damaged MBR, but we had already fixed that, the next items are all specific to the Windows OS. We have a Boot Configuration Data (BCD) that contains information required to boot the system. This is used in Windows Vista and newer and replaces the boot.ini that was used by previous version. Now we are in a command prompt, we can try and fix this
X:\Sources>bootrec /fixmbr
The operation completed successfully
X:\Sources>bootrec /fixboot
The operation completed successfully
X:\Sources>bootrec /rebuildbcd
Successfully scanned Windows installations.
Total identified Windows installations: 1
[1] C:\Windows
Add installation to boot list? Yes (Y)/No (N)/All(A): Y (select ‘Yes’ by responding with ‘Y’)
The operation completed successfully
The first command fixes the MBR, just in case there was an error we couldn’t see. That might include corrupt assembly code that isn’t easily visible. The second and third commands relate to the BCD and, as we can see from the output, it identified the Windows OS on the disk. After this, we restarted the virtual machine and came up with the same OS no found error.
So restart the machine and back into the Windows Installation disk. This time we navigate through Repair your computer > Troubleshoot > Advanced Options > Startup Repair. It displays the detected operating system(s) that can be repaired.

This then shows us the OS’s that can be seen and we select our Windows 7 operating system as the one that needs repairing. It then runs through its process and restarts the VM. This time, the VM gives us the option to start Windows normally or to start in safe mode. Selecting starting windows normally gives a blue screen.

Still this is a further step forward, and those who deal with VM’s regularly know there are a variety of methods for fixing this kind of error. However by this point I just wanted the thing to boot, so we went back to VFC. By mounting the VMDK that was attached to our Virtualbox machine, we could point VFC at the (now fixed) disk and generate the Virtual Machine. This then booted us straight through to the Windows Login screen. Hooray!

If this hadn’t worked, there were still a couple of options left for us, the most notable was using the Windows boot disc to restore the operating system to an earlier point in time. This would hopefully give us a point at which the system was still in working order.
As you can see, this is a very long winded way of creating a VM, but it does allow us to virtualise a machine that appears. So thanks for reading my first post and hopefully it has been useful, or at the very least, entertaining!

Great write up! Look forward to many more!
LikeLiked by 1 person